A server chassis is more than just a metal box. It serves as the foundation of your system, housing and protecting critical components like the motherboard, power supply, and storage drives. Choosing the right chassis directly impacts how well your system performs and how long it lasts.
The primary role of a server chassis is to provide protection, organization, and efficient cooling. It shields sensitive hardware from dust, debris, and physical damage. At the same time, it keeps components neatly arranged, ensuring easy access for upgrades or maintenance. Proper cooling is another key function, as it prevents overheating and extends the lifespan of your system.
Selecting the right chassis isn’t just about size or appearance. It’s about ensuring compatibility with your hardware, optimizing airflow, and supporting your system’s workload. A poorly chosen chassis can lead to overheating, limited expansion options, or even hardware failure.
By understanding the role of a server chassis and its impact on performance, you can make an informed decision. The right choice will protect your investment, improve efficiency, and ensure your system runs smoothly for years to come.
What is the Difference Between a Rackmount and a Tower Server Chassis?
Choosing between a rackmount and a tower server chassis depends on your specific needs, available space, and system requirements. Each type has distinct features that cater to different use cases. Let’s break down the key differences to help you make the right choice.
Rackmount Server Chassis
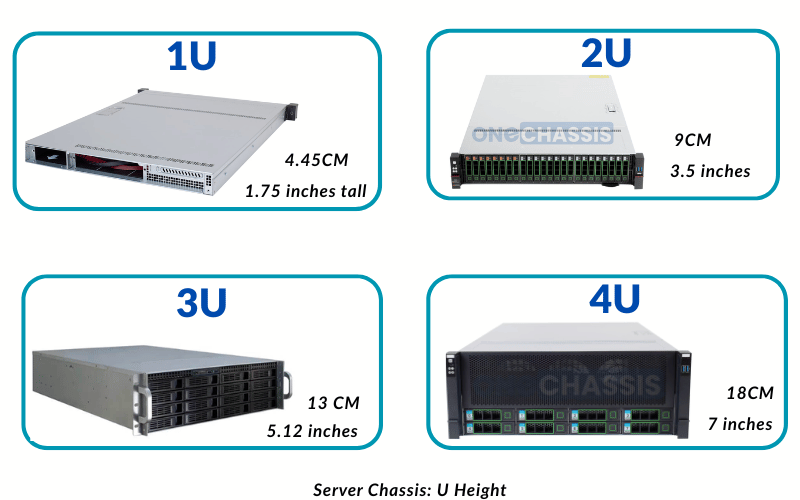
A rackmount chassis is designed to fit into a standardized server rack. These racks typically come in sizes measured in “U” units, with 1U equaling 1.75 inches in height. Rackmount chassis options range from compact 1U models to larger 4U or 5U designs, depending on the hardware you need to house.
Rackmount servers excel in environments where space efficiency is critical. Data centers, for example, rely on rackmount systems to stack multiple servers vertically, maximizing the use of floor space. These chassis often include features like hot-swappable drive bays, redundant power supplies, and optimized airflow for cooling in dense setups.
However, rackmount systems require a dedicated rack for installation, which adds to the initial cost. They also tend to generate more noise due to high-speed fans, making them less suitable for quiet office environments.
Tower Server Chassis
A tower server chassis resembles a traditional desktop PC case but is built to handle server-grade components. These chassis are freestanding and do not require a rack for installation, making them a practical choice for smaller setups or offices without dedicated server rooms.
Tower servers offer more internal space for components, which allows for better airflow and quieter operation. They are ideal for businesses that need a single server or a small number of servers without the complexity of a rack system.
On the downside, tower chassis take up more physical space and are less efficient for scaling. If you plan to expand your server infrastructure, transitioning from towers to rackmount systems may require significant adjustments.

Please remember:
When deciding between a rackmount and a tower chassis, consider the following:
- Space: If you have limited space and need to scale, rackmount systems are the better choice. For standalone setups, towers work well.
- Noise: Rackmount systems are louder due to compact designs and high-speed fans. Towers are quieter and better suited for office environments.
- Scalability: Rackmount systems allow for easier expansion in data centers or multi-server setups. Towers are less scalable but simpler for small-scale use.
- Cost: Towers are more affordable upfront, while rackmount systems require additional investment in racks and cooling infrastructure.
By understanding these differences, you can align your choice with your operational needs and future growth plans. Whether you prioritize space efficiency or simplicity, selecting the right chassis ensures your system performs reliably and meets your goals.
How Do I Determine the Right Size (1U, 2U, 4U, etc.) for My Server Chassis?
Selecting the right server chassis size is a critical decision that impacts your system’s performance, scalability, and cooling efficiency. The “U” measurement, which stands for rack unit, defines the height of the chassis. One rack unit (1U) equals 1.75 inches. Let’s explore how to choose the right size based on your hardware and operational needs.
Assess Your Hardware Requirements
Start by evaluating the components you plan to install. A 1U chassis is compact and ideal for lightweight setups, but it has limited space for GPUs, storage drives, and cooling systems. If you need to house multiple GPUs, high-capacity storage, or advanced cooling solutions, a larger chassis like 2U, 4U, or even 5U will provide the necessary room.
For example, a 1U chassis might work for a basic web server or firewall, but a 4U chassis is better suited for GPU-intensive tasks like AI training or video rendering. Always match the chassis size to the hardware demands of your workload.
Consider Cooling and Airflow
Smaller chassis sizes, such as 1U and 2U, have less internal space, which can restrict airflow. This makes them more challenging to cool, especially in high-performance systems. If your setup includes multiple GPUs or high-power CPUs, a larger chassis like 4U offers better airflow and accommodates more robust cooling solutions, such as liquid cooling or larger fans.
In environments where heat management is critical, prioritize a chassis size that supports efficient cooling. Overheating can lead to performance throttling or hardware failure, so don’t underestimate the importance of proper airflow.
Plan for Scalability
Think about your future needs. If you anticipate expanding your system, choose a chassis size that allows for additional components. A 2U chassis might meet your current requirements, but a 4U chassis provides more flexibility for upgrades, such as adding GPUs, storage drives, or redundant power supplies.
Scalability is especially important in data centers or businesses with growing workloads. A slightly larger chassis can now save you the hassle of replacing it later.
Rack Space Availability
Check the available space in your server rack. If you’re working with a compact rack, you may need to prioritize smaller chassis sizes like 1U or 2U. For larger racks, you have more freedom to choose bigger chassis sizes.
Keep in mind that larger chassis take up more rack units, which can limit the number of servers you can install. Balance your need for hardware capacity with the available rack space to optimize your setup.
Key Takeaways
- 1U: Best for lightweight setups with minimal hardware. Limited cooling and expansion options.
- 2U: Offers more room for additional components and better cooling than 1U. Suitable for moderate workloads.
- 4U and above: Ideal for GPU-heavy systems, advanced cooling, and future scalability. Provides ample space for high-performance setups.
By carefully evaluating your hardware, cooling needs, scalability, and rack space, you can confidently select the right chassis size. The goal is to ensure your system runs efficiently today while leaving room for growth tomorrow.
What Cooling Options Should I Look for in a Server Chassis?
Effective cooling is essential for maintaining the performance and longevity of your server components. Without proper cooling, heat can build up, leading to throttled performance or even hardware failure. Let’s explore the key cooling options you should consider when selecting a server chassis.
Air Cooling
Air cooling is the most common and cost-effective option for server chassis. It relies on fans to move air through the chassis, dissipating heat from components like CPUs, GPUs, and power supplies.
When evaluating air cooling, pay attention to the number and placement of fan mounts. A well-designed chassis will have intake fans at the front and exhaust fans at the rear, creating a steady airflow path. For GPU-heavy systems, look for chassis with additional side or top-mounted fan options to target heat-prone areas.
Fan size also matters. Larger fans, such as 120mm or 140mm, move more air at lower speeds, reducing noise while maintaining cooling efficiency. Smaller fans, like 80mm, are common in compact chassis but may generate more noise due to higher RPMs.
Liquid Cooling
For high-performance systems, especially those with multiple GPUs, liquid cooling offers superior heat management. Liquid cooling systems use a pump to circulate coolant through tubes and blocks attached to heat-generating components. The heat is then transferred to a radiator, where fans dissipate it.
When considering liquid cooling, ensure the chassis has enough space to accommodate radiators. Many 4U and larger chassis support 240mm or 360mm radiators, which are ideal for cooling multiple GPUs or CPUs. Check for pre-drilled mounting points and cable management features to simplify installation.
Liquid cooling is more complex and expensive than air cooling, but it provides unmatched thermal performance for demanding workloads like AI training or 3D rendering.
Hot-Swappable Fans
Hot-swappable fans are a valuable feature in server chassis designed for continuous operation. These fans can be replaced without shutting down the system, minimizing downtime during maintenance.
Look for chassis with tool-less fan trays or modules, which make it easy to access and replace fans. This feature is particularly useful in data centers or environments where uptime is critical.
Airflow Design
A chassis with a well-thought-out airflow design can make a significant difference in cooling efficiency. Look for features like:
- Perforated panels: These improve ventilation by allowing air to flow freely.
- Dedicated GPU airflow channels: Some chassis include separate airflow paths for GPUs to prevent heat buildup.
- Cable management options: Proper cable routing reduces airflow obstructions, improving overall cooling.
Monitoring and Control
Modern server chassis often include fan controllers or monitoring systems. These allow you to adjust fan speeds based on temperature readings, optimizing cooling performance while reducing noise. Some advanced systems integrate with software for real-time monitoring and control.
Key Takeaways
- Air cooling: Affordable and effective for most setups. Prioritize larger fans and proper airflow paths.
- Liquid cooling: Ideal for high-performance systems with multiple GPUs. Ensure the chassis supports radiator installation.
- Hot-swappable fans: Essential for minimizing downtime in critical environments.
- Airflow design: Look for perforated panels, GPU airflow channels, and good cable management.
- Monitoring systems: Enable precise control over cooling performance and noise levels.
By selecting the right cooling options, you can ensure your server chassis keeps your components running at peak performance, even under heavy workloads. Cooling isn’t just a feature—it’s a necessity for reliable and efficient operation.
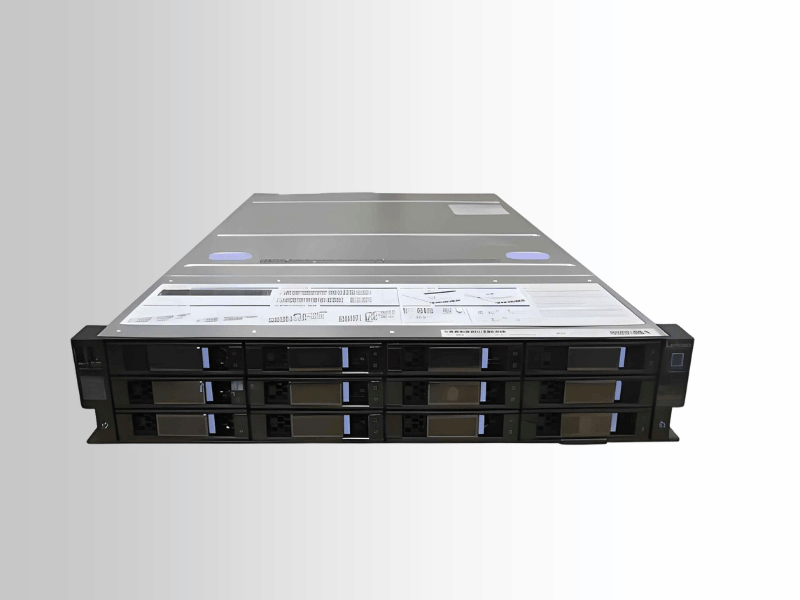
How Many Drive Bays Do I Need, and Should I Consider Hot-Swappable Options?
The number of drive bays and the inclusion of hot-swappable options are critical factors when selecting a server chassis. These decisions directly impact your storage capacity, system flexibility, and ease of maintenance. Let’s break this down to help you make an informed choice.
Determining the Number of Drive Bays
Start by assessing your current and future storage needs. If your system is designed for data-heavy tasks like AI training, video editing, or database management, you’ll need more drive bays to accommodate high-capacity storage.
For smaller setups, 4 to 6 drive bays may be sufficient. These configurations work well for general-purpose servers or light workloads. However, for enterprise-level systems or GPU-heavy servers, consider chassis with 8, 12, or even 24 drive bays. This ensures you have enough room for both SSDs and HDDs, allowing you to balance speed and capacity.
If you plan to use RAID configurations for redundancy or performance, factor in the additional drives required. For example, a RAID 10 setup needs at least four drives, while RAID 6 requires a minimum of six. Always leave room for expansion to avoid running out of storage prematurely.
Benefits of Hot-Swappable Drive Bays
Hot-swappable drive bays allow you to replace or upgrade drives without shutting down the system. This feature is invaluable in environments where uptime is critical, such as data centers or production servers.
Look for chassis with tool-less hot-swap trays. These make it easy to slide drives in and out, saving time during maintenance. Some models also include LED indicators on the drive bays, which show the status of each drive at a glance.
Hot-swappable options are particularly useful for systems with frequent storage upgrades or replacements. For example, if you’re running a server that processes large datasets daily, the ability to swap drives quickly can minimize downtime and keep operations running smoothly.
Drive Bay Compatibility
Ensure the drive bays in your chassis support the types of drives you plan to use. Most modern chassis accommodate both 2.5-inch SSDs and 3.5-inch HDDs. Some even include adapters for NVMe drives, which offer faster speeds for high-performance applications.
If you’re using enterprise-grade drives, check for compatibility with SAS (Serial Attached SCSI) drives in addition to SATA. SAS drives are common in data centers due to their reliability and speed, but they require specific backplanes and connectors.

Key Considerations
- Current needs: Calculate how many drives you need for your workload today.
- Future growth: Choose a chassis with extra drive bays to allow for expansion.
- Hot-swappable options: Prioritize this feature for systems requiring high uptime or frequent maintenance.
- Compatibility: Ensure the drive bays support your preferred drive types, including SSDs, HDDs, or NVMe.
By carefully evaluating your storage requirements and the benefits of hot-swappable options, you can select a server chassis that meets your needs now and adapts to future demands. Storage isn’t just about capacity—it’s about flexibility and efficiency in managing your data.
What Type of Expansion Slots Should My Server Chassis Have for Future Upgrades?
Expansion slots are the backbone of your server’s scalability. They allow you to add GPUs, network cards, storage controllers, and other components as your system grows. Choosing the right type and number of expansion slots ensures your server can adapt to future demands without requiring a complete overhaul.
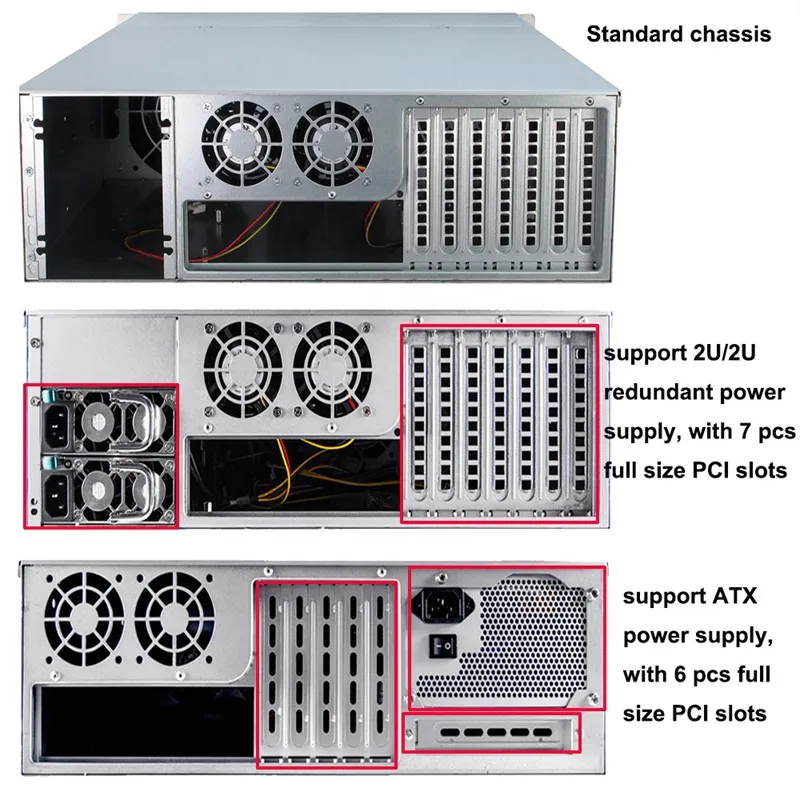
PCIe Slots: The Gold Standard
Peripheral Component Interconnect Express (PCIe) slots are the most common and versatile expansion slots in modern server chassis. They support a wide range of components, including GPUs, NVMe storage cards, and high-speed network adapters.
When selecting a chassis, check the number and type of PCIe slots available. PCIe slots come in different sizes, such as x4, x8, and x16, which indicate the number of data lanes. For GPU-heavy systems, prioritize x16 slots, as they provide the bandwidth needed for high-performance GPUs.
For example, if you’re building a server for AI training or 3D rendering, ensure the chassis has multiple x16 slots to accommodate multiple GPUs. On the other hand, if your focus is on storage or networking, x4 or x8 slots may suffice for adding RAID controllers or 10GbE network cards.
Riser Cards and Vertical Mounting
In compact chassis, such as 1U or 2U models, space constraints can limit the number of full-height PCIe slots. To address this, many chassis include riser cards, which allow you to mount PCIe devices horizontally.
If you’re working with a smaller chassis, check for riser card compatibility. This feature ensures you can still install GPUs or other expansion cards without sacrificing space or airflow. Some chassis even support dual riser cards, enabling multiple horizontal PCIe slots in a compact form factor.
Specialized Slots for GPUs
For GPU-intensive workloads, look for chassis with dedicated GPU mounting options. These may include reinforced PCIe slots to support the weight of large GPUs or additional power connectors for high-wattage cards.
Some chassis also feature GPU airflow channels or brackets to secure the cards during operation. These features are essential for maintaining stability and cooling in systems with multiple GPUs.
Legacy Slots: Are They Necessary?
While PCIe dominates modern servers, some systems may still require legacy slots like PCI or AGP for older hardware. If your setup includes legacy components, ensure the chassis supports these slots. However, for most new builds, focusing on PCIe slots is the best approach.
Key Considerations
- Number of slots: Ensure the chassis has enough PCIe slots for your current and future needs.
- Slot size: Match the slot size (x4, x8, x16) to the components you plan to install.
- Riser cards: Check for riser card compatibility in compact chassis to maximize space.
- GPU support: Look for reinforced slots and additional cooling features for GPU-heavy systems.
- Legacy slots: Only consider these if your system requires older hardware.
By selecting a server chassis with the right expansion slots, you can future-proof your system and ensure it remains adaptable to new technologies. Expansion slots aren’t just a feature—they’re your system’s gateway to growth and performance.
Is a Modular Power Supply Necessary for My Server Chassis, and How Do I Choose the Right One?
The power supply is the lifeline of your server, delivering the energy needed to keep your components running smoothly. Choosing the right power supply—and deciding whether a modular design is necessary—can significantly impact your system’s performance, efficiency, and ease of maintenance.
What is a Modular Power Supply?
A modular power supply allows you to connect only the cables you need for your system. Unlike non-modular power supplies, which come with a fixed set of cables, modular units let you customize the cable setup. This reduces clutter, improves airflow, and simplifies cable management.
For server chassis, especially those with limited space or high airflow requirements, a modular power supply can be a game-changer.
When is a Modular Power Supply Necessary?
A modular power supply is particularly useful in the following scenarios:
- Compact chassis: In smaller server chassis, such as 1U or 2U models, space is at a premium. Modular power supplies eliminate unnecessary cables, freeing up room for better airflow and easier component access.
- High-performance systems: GPU-heavy servers or systems with multiple drives require precise cable management to avoid obstructing airflow. Modular designs help keep the interior organized, ensuring efficient cooling.
- Frequent upgrades or maintenance: If you plan to upgrade components regularly, a modular power supply makes it easier to add or remove cables without disturbing the entire setup.
However, for simpler setups or budget-conscious builds, a non-modular or semi-modular power supply may suffice.
How to Choose the Right Power Supply
Selecting the right power supply involves more than just deciding between modular and non-modular designs. Here are the key factors to consider:
Wattage Capacity
Calculate the total power consumption of your components, including CPUs, GPUs, storage drives, and fans. Add a 20-30% buffer to ensure the power supply can handle peak loads. For example, a server with multiple GPUs may require a 1000W or higher power supply, while a basic setup might only need 500W.
Efficiency Rating
Look for power supplies with an 80 PLUS certification. This rating indicates energy efficiency, with levels ranging from Bronze to Titanium. Higher efficiency reduces energy waste and lowers operating costs, which is especially important for servers running 24/7.
Redundancy
For mission-critical systems, consider a chassis that supports redundant power supplies. These setups include two power supplies, ensuring uninterrupted operation if one fails. Redundant power supplies are common in enterprise environments where uptime is crucial.
Connector Compatibility
Ensure the power supply has enough connectors for your components. For GPU-heavy systems, check for multiple 6-pin or 8-pin PCIe connectors. For storage-heavy setups, confirm there are sufficient SATA or Molex connectors.
Form Factor
Match the power supply’s form factor to your chassis. Most server chassis use standard ATX power supplies, but compact models may require SFX or proprietary designs. Always verify compatibility before purchasing.
Key Takeaways
- Modular power supplies: Ideal for compact, high-performance, or frequently upgraded systems.
- Wattage: Choose a power supply with enough capacity and a 20-30% buffer for peak loads.
- Efficiency: Opt for 80 PLUS certified units to reduce energy waste.
- Redundancy: Consider dual power supplies for critical systems.
- Compatibility: Ensure the power supply fits your chassis and supports all components.
By carefully evaluating your system’s power needs and the benefits of modular designs, you can select a power supply that ensures reliability, efficiency, and ease of use. A well-chosen power supply isn’t just a component—it’s the foundation of a stable and efficient server.
What Are the Best Practices for Cable Management in a Server Chassis?
Proper cable management in a server chassis is more than just about aesthetics. It directly impacts airflow, cooling efficiency, and ease of maintenance. A well-organized chassis ensures your system runs smoothly and remains accessible for future upgrades or repairs. Let’s dive into the best practices for managing cables effectively.
Plan Your Layout Before Installation
Before you start connecting components, take a moment to plan the cable layout. Identify where each cable will run and how it will connect to the motherboard, power supply, and other components.
Use the chassis’s built-in cable routing features, such as cutouts, tie-down points, and cable channels. These are designed to guide cables along specific paths, keeping them out of the way of airflow and critical components.

Use the Right Tools and Accessories
Invest in tools and accessories that make cable management easier and more secure. Some essentials include:
- Cable ties: Use reusable Velcro ties for flexibility or zip ties for a more permanent solution.
- Cable combs: These help organize and align cables neatly, especially for power supply cables.
- Cable clips or anchors: Attach these to the chassis to secure cables along designated paths.
Avoid using tape or other temporary fixes, as they can leave residue and fail over time.
Separate Power and Data Cables
Keep power cables and data cables on separate paths whenever possible. This reduces electromagnetic interference (EMI), which can affect data transmission and system performance.
For example, route SATA or NVMe cables away from PCIe power cables. Many server chassis include separate routing channels for this purpose, so take advantage of these features.
Bundle and Secure Excess Cables
Excess cable length can create clutter and obstruct airflow. Bundle unused cables neatly and secure them with cable ties or straps. Avoid cramming excess cables into tight spaces, as this can damage the cables or block ventilation.
If your power supply is modular, disconnect unused cables entirely to reduce clutter. For non-modular power supplies, consider using cable sleeves to group and manage excess cables.
Optimize Airflow
Good cable management improves airflow, which is critical for cooling. Ensure cables do not block intake or exhaust fans, heat sinks, or airflow channels.
For GPU-heavy systems, pay special attention to the area around the GPUs. Use cable ties or clips to keep cables away from the fans and ensure unobstructed airflow to these high-heat components.
Label Your Cables
Labeling cables may seem tedious, but it saves time during maintenance or upgrades. Use pre-printed labels or write on adhesive tags to identify each cable’s purpose. For example, label power cables for specific components like GPUs, storage drives, or fans.
This practice is especially helpful in systems with multiple identical cables, such as those in RAID setups or multi-GPU configurations.
Regularly Inspect and Adjust
Cable management isn’t a one-time task. Periodically inspect your chassis to ensure cables remain secure and organized. Adjust as needed, especially after adding or replacing components.
Loose or poorly managed cables can shift over time, potentially causing airflow issues or even disconnections. Regular maintenance keeps your system running efficiently.
Key Takeaways
- Plan ahead: Map out your cable layout before installation.
- Use tools: Invest in cable ties, combs, and clips for secure management.
- Separate cables: Keep power and data cables on different paths to reduce interference.
- Bundle excess: Neatly secure unused cables to avoid clutter.
- Prioritize airflow: Ensure cables don’t obstruct fans or cooling components.
- Label cables: Identify each cable for easier maintenance.
- Inspect regularly: Check and adjust cable management over time.
By following these best practices, you can create a clean, efficient, and easily maintainable server chassis. Proper cable management isn’t just about tidiness—it’s about optimizing performance and ensuring your system stays reliable under any workload.
How Do I Ensure My Server Chassis Is Compatible with My Motherboard and Other Components?
Selecting a server chassis that fits your motherboard and other components is crucial for building a reliable and efficient system. Compatibility issues can lead to installation headaches, poor airflow, or even hardware damage. Let’s break down the steps to ensure everything fits together seamlessly.
Match the Chassis to Your Motherboard Form Factor
The first step is to confirm that your server chassis supports your motherboard’s form factor. Motherboards come in various sizes, such as:
- ATX: Common for standard servers, offering plenty of expansion slots.
- Micro-ATX: Smaller than ATX, suitable for compact setups with fewer components.
- Mini-ITX: Ideal for space-saving builds but limited in expansion options.
- E-ATX: Larger than ATX, designed for high-performance systems with multiple GPUs or additional features.
Check the chassis specifications to ensure it explicitly lists support for your motherboard’s form factor. For example, if you’re using an E-ATX motherboard, a standard ATX chassis won’t provide enough space.
Verify Clearance for GPUs and Other Expansion Cards
If your system includes GPUs or other expansion cards, ensure the chassis provides enough clearance. High-performance GPUs, such as NVIDIA RTX or AMD Radeon models, can be long and bulky.
Measure the length and height of your GPU and compare it to the chassis’s GPU clearance specifications. Some chassis also include reinforced PCIe slots or brackets to support the weight of larger GPUs, which is essential for stability.
For multi-GPU setups, confirm that the chassis has enough PCIe slots and adequate spacing between them to prevent overheating.
Check for CPU Cooler and RAM Clearance
Cooling solutions and RAM modules can also affect compatibility. Large air coolers or liquid cooling radiators require sufficient space inside the chassis.
- Air coolers: Measure the height of your CPU cooler and ensure it fits within the chassis’s maximum cooler height.
- Liquid cooling: Check for radiator mounting points and ensure the chassis supports the size of your radiator (e.g., 240mm, 360mm).
For RAM, consider the height of the modules, especially if they have tall heat spreaders. Ensure there’s enough clearance between the RAM slots and the CPU cooler or other nearby components.
Confirm Drive Bay Compatibility
If your system includes multiple storage drives, verify that the chassis has enough drive bays to accommodate them. Check for compatibility with:
- 2.5-inch SSDs
- 3.5-inch HDDs
- NVMe drives (via PCIe or M.2 slots)
Some chassis include hot-swappable drive bays, which are convenient for systems requiring frequent drive replacements.
Power Supply Fit and Cable Routing
Ensure the chassis supports your power supply’s form factor, typically ATX or SFX. For compact chassis, double-check the dimensions to avoid a tight fit.
Look for cable routing features like cutouts, tie-down points, and cable channels. These make it easier to connect the power supply to your components without obstructing airflow.
Front and Rear I/O Panel Alignment
Your motherboard’s I/O ports must align with the chassis’s rear panel. Most modern chassis include a removable I/O shield to match the motherboard layout.
For front I/O ports, such as USB or audio jacks, ensure the chassis provides the connections you need. Check that the front panel cables are compatible with your motherboard’s headers.
Key Considerations
- Motherboard form factor: Match the chassis to your motherboard size (ATX, Micro-ATX, etc.).
- GPU clearance: Ensure enough space for the length, height, and weight of your GPUs.
- Cooling compatibility: Check for CPU cooler height and radiator mounting options.
- Drive bays: Verify support for your storage needs, including SSDs, HDDs, and NVMe drives.
- Power supply fit: Confirm the power supply form factor and cable routing features.
- I/O alignment: Ensure the rear and front I/O panels align with your motherboard and needs.
By carefully reviewing these factors, you can avoid compatibility issues and build a server that performs reliably. A well-matched chassis isn’t just a container—it’s the framework that brings your entire system together.
What Security Features Should I Look for in a Server Chassis to Protect My Hardware?
Protecting your server hardware goes beyond performance and cooling—it’s about ensuring physical security to safeguard your investment. A secure server chassis can prevent unauthorized access, tampering, and even theft. Let’s explore the key security features you should prioritize when selecting a chassis.
Lockable Front Panels
A lockable front panel is one of the most basic yet effective security features. It prevents unauthorized individuals from accessing the power button, drive bays, or USB ports.
When evaluating this feature, look for:
- Durable locks: Choose a chassis with sturdy, tamper-resistant locks that can withstand attempts to force them open.
- Keyed or combination options: Some chassis offer keyed locks, while others use combination mechanisms for added convenience.
This feature is especially important in shared environments like data centers or offices, where multiple people may have physical access to the server.
Intrusion Detection Systems
Some advanced server chassis include intrusion detection systems. These systems trigger an alert if the chassis is opened without authorization.
For example, a chassis with an intrusion detection switch can send a signal to the motherboard or monitoring software, notifying administrators of a potential breach. This feature is invaluable for environments where security is a top priority, such as financial institutions or government facilities.
Secured Drive Bays
Hot-swappable drive bays are convenient, but they can also be a security risk if left unprotected. Look for chassis with lockable drive bays to prevent unauthorized removal or tampering with storage drives.
For added security, some chassis include individual locks for each drive bay, ensuring that only authorized personnel can access specific drives.
Tamper-Proof Screws and Panels
Tamper-proof screws and panels add an extra layer of security by making it more difficult to open the chassis without the proper tools.
When selecting a chassis, check if it includes:
- Specialized screws: These require unique tools to remove, deterring casual tampering.
- Reinforced panels: Thicker, more durable panels are harder to breach, providing better protection for internal components.
Rackmount Security Features
If you’re using a rackmount chassis, consider additional security measures specific to rack installations. These include:
- Rackmount rails with locks: Prevent the chassis from being removed from the rack without authorization.
- Secured rack doors: Ensure the rack itself has lockable front and rear doors for added protection.
These features are particularly useful in data centers or co-location facilities where multiple clients share rack space.
Cable Security
Cables are often overlooked in physical security, but they can be a weak point. Look for chassis with cable management features that allow you to secure power and data cables.
Some chassis include cable locking mechanisms or tie-down points to prevent accidental disconnections or intentional tampering.
Environmental Monitoring
While not a direct physical security feature, environmental monitoring can enhance overall protection. Chassis with built-in sensors for temperature, humidity, and airflow can alert you to conditions that might indicate tampering or sabotage, such as blocked vents or disconnected fans.
Key Considerations
- Lockable panels: Prevent unauthorized access to the chassis interior and front ports.
- Intrusion detection: Receive alerts for unauthorized openings.
- Drive bay locks: Secure hot-swappable drives against tampering or theft.
- Tamper-proof screws: Deter casual tampering with specialized fasteners.
- Rack security: Use lockable rails and secured rack doors for rackmount setups.
- Cable protection: Secure power and data cables to prevent disconnections.
- Monitoring sensors: Detect environmental changes that could indicate tampering.
By prioritizing these security features, you can protect your server hardware from physical threats and ensure the integrity of your system. A secure chassis doesn’t just house your components—it acts as the first line of defense for your critical infrastructure.
What Are the Key Factors to Consider When Balancing Cost, Durability, and Scalability in a Server Chassis?
Selecting a server chassis often feels like walking a tightrope between cost, durability, and scalability. Each factor plays a critical role in determining the long-term value of your investment. Let’s break down how to evaluate these elements without compromising on your system’s performance or future growth.
Cost: Finding Value Without Sacrificing Quality
Budget constraints are a reality for most projects, but cutting corners on a server chassis can lead to costly issues down the line. Instead of focusing solely on the price tag, consider the value the chassis provides.
- Material quality: Look for chassis made from durable materials like steel or aluminum. Steel offers strength and stability, while aluminum is lightweight and resists corrosion. Avoid cheaper plastic components that can crack or warp under stress.
- Essential features: Prioritize features that directly impact performance, such as efficient cooling, proper cable management, and sufficient drive bays. Avoid paying extra for unnecessary bells and whistles.
- Warranty and support: A slightly higher upfront cost may be worth it if the chassis comes with a robust warranty and reliable customer support.
Durability: Building for Longevity
A durable chassis protects your hardware and ensures your system can withstand the demands of continuous operation. Durability is especially important in environments like data centers or industrial settings, where servers face constant use.
- Structural integrity: Choose a chassis with reinforced panels and a sturdy frame. This is particularly important for rackmount systems, which need to support the weight of multiple components without bending or sagging.
- Cooling design: A durable chassis should include features like perforated panels, dust filters, and optimized airflow paths to prevent overheating and extend the lifespan of your components.
- Corrosion resistance: If your server will operate in a humid or industrial environment, look for chassis with anti-corrosion coatings or materials.
Scalability: Planning for Future Growth
Scalability ensures your server chassis can adapt to your evolving needs. A chassis that supports expansion saves you from having to replace it entirely as your system grows.
- Drive bays: Opt for a chassis with more drive bays than you currently need. This allows you to add storage as your data requirements increase.
- Expansion slots: Ensure the chassis has enough PCIe slots to accommodate additional GPUs, network cards, or other components.
- Cooling capacity: Choose a chassis that can handle the heat output of future upgrades, such as additional GPUs or high-power CPUs. Look for support for larger fans or liquid cooling systems.
- Rack compatibility: If you’re using a rackmount chassis, ensure it fits standard rack sizes and allows for easy integration with other equipment.
Balancing the Three Factors
Balancing cost, durability, and scalability requires a clear understanding of your priorities. For example:
- If you’re building a short-term system, you might prioritize cost over scalability.
- For a long-term investment, focus on durability and scalability, even if it means a higher upfront cost.
- In high-performance environments, durability and scalability should take precedence to ensure reliability and future-proofing.
Key Considerations
- Cost: Focus on value, not just price. Invest in quality materials and essential features.
- Durability: Look for reinforced structures, efficient cooling, and corrosion resistance.
- Scalability: Plan for future growth with extra drive bays, expansion slots, and cooling capacity.
- Prioritization: Align your choice with your system’s purpose and expected lifespan.
By carefully weighing these factors, you can select a server chassis that meets your current needs while leaving room for future growth. A well-chosen chassis isn’t just a purchase—it’s an investment in the stability and scalability of your system.
Frequently Asked Questions
Q: What are the differences between a standard PC case and a server chassis?
A: A standard PC case is designed for personal computers and focuses on aesthetics and basic functionality. A server chassis, on the other hand, is built for performance, durability, and scalability. Server chassis often include features like hot-swappable drive bays, optimized airflow, and support for rackmount installations. They are also designed to handle higher workloads and multiple components like GPUs and storage drives.
Q: How does the U dimension in a rackmount server chassis relate to physical size?
A: The U dimension measures the height of a rackmount server chassis. One U equals 1.75 inches. For example, a 1U chassis is 1.75 inches tall, while a 2U chassis is 3.5 inches tall. This measurement helps determine how many servers can fit into a standard rack.
Q: Is it possible to install a standard desktop motherboard into a rackmount server chassis?
A: Yes, it is possible, but only if the rackmount chassis supports the motherboard’s form factor. For example, if you have an ATX desktop motherboard, you need a rackmount chassis that is compatible with ATX boards. Always check the chassis specifications to ensure compatibility.
Q: What is a backplane and why is it important in a storage server chassis?
A: A backplane is a circuit board that connects storage drives to the server’s motherboard or RAID controller. It simplifies cable management and allows for hot-swapping drives. In a storage server chassis, a backplane is essential for efficient drive installation and maintenance.
Q: How often should the air filters on a server chassis be cleaned?
A: Air filters should be cleaned every 1 to 3 months, depending on the environment. In dusty or industrial settings, clean them more frequently. Regular cleaning ensures proper airflow and prevents overheating.
Q: What factors influence the total cost of a high-quality server chassis?
A: The cost of a server chassis depends on factors like material quality, size, cooling features, scalability options, and additional features like hot-swappable bays or redundant power supplies. Investing in a durable and scalable chassis may have a higher upfront cost but offers better long-term value.
Conclusion
When purchasing a server chassis, focus on key decision factors such as compatibility with your components, cooling efficiency, scalability for future upgrades, and physical security features. Evaluate the chassis’s material quality, drive bay capacity, and support for expansion slots to ensure it meets your current and future needs.
Investing in the correct server chassis safeguards your hardware and optimizes your system’s operations, providing a reliable foundation for your workloads.