


Working in GPU server chassis design for years does something to you. You stop seeing a case as just a box and start seeing it as a thermal and structural problem waiting to be solved. Every panel, every slot, every mounting point has a job to do.
That lens applies just as much to wall-mount PC cases as it does to enterprise server builds. A wall mount chassis isn’t just a way to show off your rig. It’s a decision about airflow, component fit, weight distribution, and whether the thing will still be on the wall a year from now.
Done right, wall mounting clears your desk, opens up your floor, and gives your hardware room to breathe. Done wrong, you end up with a sagging GPU, a hotspot behind the glass, or a case anchored into nothing but drywall and hope.
This guide covers the entire decision-making process — from choosing the right chassis type to safe installation.
Wall Mount Bracket Styles for PC Installations
This quick comparison shows the pros, limits, and best use cases for fixed, tilt, swivel, and articulating wall mounts.
| Picture | Type of Wall Mount | Features | Ideal Use Cases |
|---|---|---|---|
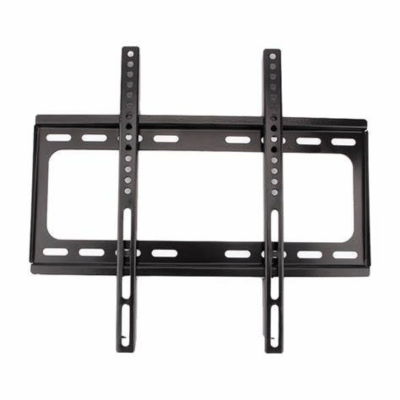 | Fixed Wall Mounts | - Pros: Budget-friendly, easy to install, and saves space with a sleek look. | Static deployment environments, such as server rooms, do not require access or relocation. |
| - Cons: No adjustability, limited accessibility for cable management or maintenance. | |||
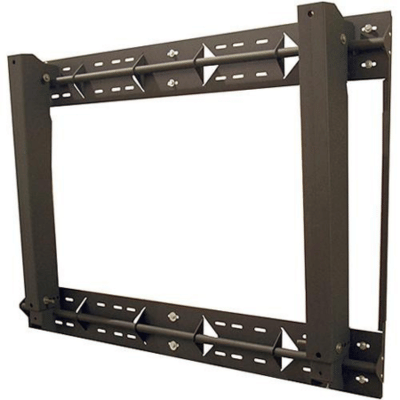 | Tilt Wall Mounts | - Pros: Allows vertical adjustments (up to 15-20°), improves access to ports and airflow, and is easy to adjust after installation. | Setups requiring better airflow direction or frequent access to rear ports. |
| - Cons: More expensive than fixed mounts and limited to vertical adjustments only. | |||
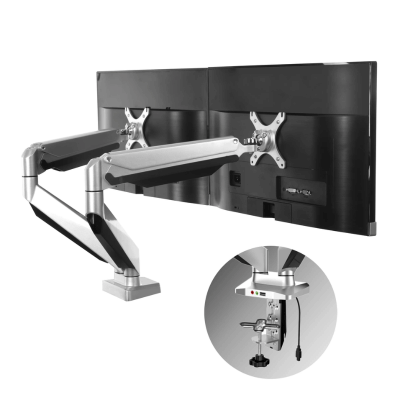 | Swivel Wall Mounts | - Pros: Provides horizontal side-to-side movement, enhances flexibility, and improves accessibility to all sides of the PC. | In these work areas, periodically adjusting the angle of your computer can help improve your field of view, enhance heat dissipation, or make it easier to use. |
| - Cons: Pricier, slightly more complex to install, and may protrude more from the wall. | |||
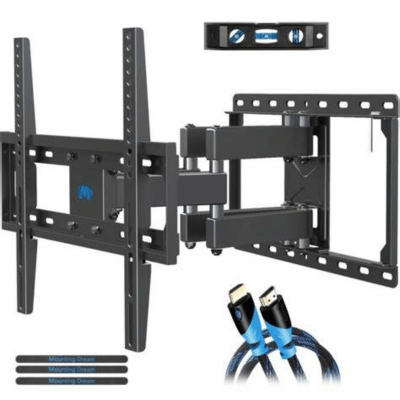 | Articulating Wall Mounts | - Pros: Offers full-motion flexibility (tilting, swiveling, arm extension), perfect for custom setups, and provides easy cable access. | Enthusiast builds or aesthetic setups where showcase appeal and constant accessibility are priorities. |
| - Cons: The most expensive type, takes up more wall space, and installation can be complex. |
Why Switch to a Wall Mount PC Case?
A wall-mount computer chassis moves your components off the desk and onto the wall, reclaiming vertical space that usually goes to waste. The desk clears. The floor opens up. In a small home office or a tight workspace, that trade alone is worth making.
But the real benefit most people miss is airflow. A tower stuffed into a desk corner or under a shelf sits in a pocket of its own exhaust. Hang that same hardware on an open wall, and the situation changes entirely. Cool air finds the intakes. Hot air climbs and escapes. The hardware breathes the way it was designed to.
There’s a practical upside, too. Lifting your build off the floor means less dust, no pet hair, and no coffee spill disasters. Open frame wall mounts are especially easy to clean and service — no digging around inside an enclosed box.
Wall Mount Chassis Types and Layouts
The best place to start isn’t spec sheets. It’s your wall and your habits. Get those two things clear, and the rest of the decision follows.
Open Frame vs Enclosed Designs
Open-frame wall-mount cases are exactly what they sound like. Components sit in a skeletal frame with no side panels, which means maximum airflow, great visibility, and fast access when you need to swap something out. The downside is exposure. Dust settles on bare components, and there’s nothing between your GPU and an accidental knock.
Enclosed wall mounts are more protective. They keep a low profile, shield hardware from bumps and debris, and tend to look cleaner from across the room. You trade a little airflow and access for better protection.
From a cooling standpoint, open frames usually have the edge — but they need more regular dusting to stay that way. My simple rule: open frame for clean spaces and builders who like to tinker; enclosed for busy or dusty rooms and anyone who wants a tidier look with less upkeep.
Vertical vs Horizontal Orientation
Vertical mounts stack tall and narrow, fitting naturally between shelves, beside a monitor, or wherever wall width is limited. Horizontal mounts spread wider and can make cable routing a little cleaner since connectors tend to line up along one edge.
Look at the actual wall before you decide. The right orientation is the one that fits the space you have, not the one that looks best in a product photo.
Product recommendation:
Advanced Wallmount Chassis: Optimized MINI-ITX Case for Wall-Mounted Desktop Solutions


Check Hardware Compatibility Before You Buy
No amount of good design makes up for parts that don’t fit. Nail down compatibility first, then choose based on features.
Motherboard Size Support
The mounting holes have to match your board. Most wall-mounted PC cases favor Mini-ITX or Micro-ATX to keep things compact, but ATX and full-tower options are available for larger builds. Confirm what the case supports before you go any further.
GPU Length, Thickness, and Sag
This is the area I pay closest attention to, and it trips up a lot of builders. Modern cards are long, heavy, and thick. Check the maximum GPU length and thickness to make sure the card clears the frame.
Then think about sag. In a tower, gravity pulls the card down toward the PCIe slot. On a wall, the angle shifts, and that stress accumulates on the connector over time. For heavy cards — especially in vertical orientations — look for PCIe riser support and an adjustable bracket that securely holds the card. A GPU support brace is cheap and absolutely worth using.
CPU Cooler and PSU Clearance
Tall air coolers can be a tight fit in a wall mount chassis, where clearances are sometimes narrower than in a standard tower. Measure cooler height against the case spec before assuming it’ll work.
Double-check the power supply too. Some compact wall mounts only accept SFX units, not standard ATX. Get that sorted before you start buying parts.
Plan for Storage and Expansion
It’s easy to get caught up in the showpiece side of a wall mount build and overlook the practical stuff. Don’t.
Count your drive bays — figure out how many 2.5-inch and 3.5-inch slots you actually need, then confirm the case has them. Wall-mount cases sometimes sacrifice drive bays in the name of compactness.
Check PCIe slot availability if you plan to run a capture card, audio interface, or any add-in card. Compact designs don’t always leave room for extras.
Review the front panel I/O. USB-C matters more than it used to, so confirm the case has one, along with enough USB-A ports and audio jacks for your setup.
Cooling: Match the Case to Your Thermal Needs
Cooling isn’t something to figure out after the case arrives. Decide what your build needs, then find a wall mount chassis that supports it.
Airflow and Fan Support
For most builds, solid air cooling is enough. Check the number of fan mounting points and the supported sizes — 120mm and 140mm are most common. Multiple vents and PWM fan headers give you control over both airflow and noise.
Liquid Cooling: AIO vs Custom Loop
If your build runs hot or quiet operation matters, liquid cooling is worth consideration. Confirm the radiator sizes the case supports for an all-in-one cooler. For a custom loop, look specifically for integrated pump mounts and reservoir brackets — not all wall mounts have them, and retrofitting is messy.
Here’s a straightforward way to think about it:
- Air cooling works well for most builds and requires the least upkeep.
- AIO liquid cooling handles hotter or noise-sensitive setups without much added complexity.
- Custom loops make sense for high-performance or showcase builds where both appearance and maximum thermal performance matter.
One caution on custom loops in wall-mount cases: tubing needs room to route cleanly. A cramped loop in a tight chassis is both ugly and hard to maintain. Verify the clearance before you commit.
Build Quality and Safe Wall Mounting
This section matters most. A wall-mount PC case holds expensive hardware above a desk or a chair, and that’s not a situation where you cut corners on quality.
Check the rated weight capacity and make sure it covers your fully loaded build with margin to spare. Thicker steel or aluminum handles vibration better and won’t flex under a heavy GPU-and-PSU combination. VESA compatibility is a real plus — it lets you use proven, widely available TV and monitor brackets rated for serious weight.
Drywall vs Studs — Don’t Skip This
Bare drywall cannot hold a full PC build long term. The load is too much, and standard drywall anchors alone aren’t the answer for heavy hardware.
Anchor into wall studs whenever possible. If studs aren’t where you need them, use masonry anchors or heavy-duty toggle bolts rated well above your build’s total weight. Quality mounting kits assume stud or masonry fastening for a reason — they’re engineered to the load, not to best-case scenarios.
If you genuinely can’t hit a stud or masonry, a desk mount or a floor stand is the smarter call. A build that stays put is always better than one that looks right but isn’t safe.
Cable Management: Appearance and Airflow
Cable routing does two things in a wall-mounted computer build, and both matter more than most people expect.
The obvious one is appearance. Routed cables look clean behind tempered glass or in an open frame; messy cables look terrible. Look for dedicated routing channels behind the motherboard tray and plenty of tie-down points for velcro straps.
The less obvious one is thermals. Cables that bundle across fan paths and radiators restrict airflow and create hotspots. I’ve seen meaningful temperature drops in compact builds just from cleaning up cable routing. The hardware doesn’t care how tidy it looks — it cares whether air can move — but clean cable management usually achieves both.
Tempered Glass vs Open Frame Aesthetics
Tempered glass showcases the hardware beautifully. It looks polished, frames RGB lighting well, and gives the build a finished quality. The trade-off: glass adds a surface to clean and can restrict airflow depending on where the vents are located.
An open frame lets everything breathe and puts components front and center. The look is rawer, with more visible dust, but access and airflow are hard to beat.
Neither is wrong. It comes down to whether you’d rather spend a few minutes dusting every couple of weeks or spend a few minutes wiping a glass panel.
Modularity and Future-Proofing
The build you’re planning today probably isn’t the one you’ll be running in three years. Modularity is what separates a chassis that adapts from one you’ll have to replace.
Removable brackets, adjustable drive cages, modular PSU shrouds, and tool-less panels all add up to a wall mount PC case that grows with your hardware. The ability to switch between Mini-ITX and ATX, add a second radiator, or reconfigure for a vertical GPU mount without having to rebuild from scratch is genuinely valuable. It’s worth paying a bit more up front.
Plan the Installation Before You Drill
A few minutes of preparation here prevents a lot of frustration later. Before you touch a drill:
- Pick your wall location. Stay close to power outlets and your internet connection to avoid cable runs stretching across the room.
- Find the studs. Use a stud finder and mark them clearly before drilling any holes.
- Think through cable lengths. Your monitor, keyboard, and peripherals all need to reach the mounted PC comfortably. Measure before you assume.
- Gather everything you need. Anchors, screws, drill bits, a level — confirm you have it all on hand before you start.
The classic installation mistakes are a cable that comes up two feet short and holes drilled into dead air. Both are easily avoided by walking through this list first.
Frequently Asked Questions
How do you clean a wall-mounted computer without getting dust everywhere?
Power it down, then use short bursts of compressed air to blow dust away from the components and toward open space. Keep a small vacuum nozzle nearby to catch debris before it settles. Open-frame wall mounts are the easiest to clean quickly. Glass panels just need a wipe-down.
Do wall-mount cases attract more dust than traditional cases?
Open-frame designs do collect visible dust because parts are exposed. That said, mounting off the floor keeps hardware away from the heaviest sources — floor-level debris, pet hair, and foot-traffic airflow. The dust you get is usually easier to reach than the dust that builds up inside a sealed tower under a desk.
Is it safe to mount a heavy PC on drywall?
Not on bare drywall. Anchor into studs or masonry, or use heavy-duty toggle bolts rated well above the total weight of your build. For serious hardware, a VESA-rated bracket on studs is the right approach. If you can’t achieve that, a stand is the safer choice.
Do wall-mounted computers run louder without insulation?
Sometimes, slightly. Enclosed cases muffle fan and pump noise in ways an open-frame wall mount doesn’t. In practice, better airflow often lets fans spin at lower speeds, which helps offset the difference. Quiet PWM fans and a sensible fan curve go a long way.
What tools do you need for a wall-mount chassis installation?
A stud finder, drill, drill bits sized for your anchors, screwdriver, level, and tape measure cover most installations. Bring the mounting hardware from your bracket kit and confirm it matches your wall type. A second person to help lift the loaded chassis into position is genuinely useful.
Can you mount a standard PC case on the wall with brackets?
Yes, if the brackets are rated for the weight and anchored into studs. VESA-compatible, purpose-built wall-mount brackets can hold conventional cases. What they can’t do is make a heavy tower safe on bare drywall. Anchoring is always the critical part.
How to Pick the Best Wall Mount Chassis for Your Setup
The right wall-mount computer chassis is the one that fits your hardware, suits your wall, and handles your cooling needs without compromise.
Start with fit. Confirm the motherboard size, GPU clearance, and PSU form factor before anything else. Then choose your case type based on your environment — open frame wall mount for clean, accessible spaces; enclosed for anywhere dustier or more demanding. Sort out your cooling approach, confirm the chassis supports it, and then look at mounting hardware and frame quality.
Before you finalize anything, take a few minutes with a tape measure. Check your wall space, plan your cable runs, and locate your studs. The wall-mounted computers that go up cleanly and stay up are the ones where someone did that work before drilling a single hole.
Get fit, cooling, and mounting right. The rest takes care of itself.
